Showing posts with label Teacher Appreciation. Show all posts

Thursday, May 26, 2011

Teacher Appreciation Round-up

School is almost over!! (except for my poor nieces, who have year round school....they have to go to school even in JULY. That just seems wrong to me!)  I know Teacher Appreciation week was just a few weeks ago, but I always like to send a little something on the last day as well.  My kids have always had great teachers, and I like them to know how much I appreciate them and how much my kids will miss them.  (I doubt the teachers have ever made them clean the bathroom or pull weeds).  They really do have such an important job and I'm glad someone out there is willing to do it!

Here are a few ideas I have seen online and thought I'd share them with you.


I thought these were so adorable!! And they look yummy.  Not only are Rice Krispie treats delicious on their own--but add Strawberry or Cherry flavored Jello and you've got a Treat! ! MMM!  So adorable, and the kids could help make these too.  Check out Nothing But Country's tutorial on how to make these.


Here is a quick and easy treat to thank those special teachers.  Perfect to throw together if you're like me and wait until the night before, even though it's been on your to-do list for a week!! Thanks to Lil' Luna for sharing the printable for this one.


 I would have a hard time being a teacher.  I'm sure there are great rewards, but the germs alone just might do me in!  Hand Sanitizer is a MUST in these classrooms and check out this cute bottle  make-over from Oopsey Daisy.


For the past couple of years, I have made the teachers these Fruit Bouquets.  They were easy and fun to make, if you can find some good fruit for a good deal. (Thank you Costco!)

Thanks to all the great teachers out there! We really, really appreciate ALL your hard work.
I'd love to see any ideas you have seen out there--what do you do for your teachers?

Wednesday, May 18, 2011

Spring Flower Balls


April showers bring May flowers!  We have certainly been getting plenty of rain (and snow) around here, but between my 4 year old daughter picking and the deer munching, I don't have as many flowers as I should!  I saw this darling idea at a bridal shower and couldn't wait to get started! The best news of all? All supplies were bought at Dollar Tree. I sure love that place....even though it becomes the Forty-Dollar-Tree each time I visit. 
Here's what you'll need:
Flowers (obviously)
Wiffle balls
Hot glue
Scissors
Ribbon (if hanging)


Start by taking the flowers apart, leaving some length of the stem like this. If they are small flowers, they might have two or three blossoms all connected with one stem. It's fine...


Put some hot glue around the holes and tuck the stem inside, pressing the flower onto the glue.

If you want to attach a ribbon, do it when you have just a couple of holes left to fill.  The first ball I made, I put the string in first and it just got in my way the whole time. But maybe you're more coordinated than I am!   Put the ribbon through two holes and tie at the top.

Tips:
Make sure your ribbon is long enough, mine were a little too short at first.
Use big flowers--it made the whole ball look bigger and fluffier. 
If the flowers are small, you can put a couple of stems in each hole.
You'll need 2-3 bunches per ball, depending on how big the flowers are and how tight you glue them on.
I wondered if these would be great smelling if I put some essential oil on a cotton ball and put it in the middle before I glued flowers on....but I haven't tried it yet.  Maybe they could help my car smell great!

And there you have it.  They sure add a splash of color!!

I got a little carried away with the picture taking....I wasn't sure what would look good! Here are all sorts of options.


*Contest Closed*

I want to give some of these away! Here's how to enter to win a set of Three Flower balls:

*Become a Follower of Happy Little Party, and leave me a comment telling me you did so
*Sign up for email updates to Happy Little Party and leave me a comment about it
*(If you already do these things, just leave a comment about it!)

Thanks and Good Luck!
Contest ends Tuesday, May 24 around noon
Linking Up:

Thursday, May 5, 2011

Fruit Bouquet {Mother's Day or Teacher Appreciation}

My sister broke her ankle a couple of years ago.  It was sad, not only for obvious reasons, but because she also missed a flight with us to go to Disneyland!  Luckily, she was able to catch up with us a couple of days later in the 'Land and we all benefited from her "wheelchair pass" which allowed us to skip to the front of the line!!  Where am I going with all of this? Well, we benefited from her broken ankle at Disneyland, and we also benefited from the fact that her boss sent her an amazing Fruit Bouquet!  (I try to look at the bright side of things :) which was easy this time since it wasn't my foot!) It was a huge and delicious bouquet, and I had never seen one in real life up to that point.  (You'd think I discovered diamonds or something from how excited I got).   I had fun picking it apart and seeing how easy it really was to put together.  Since then, I have made a few for friends and teachers, and it is a really fun gift.  Mine are smaller than the basket my sister got, but the thought is always appreciated! 

PS. If you take this to give to your friend at her birthday party, don't just set it down in the middle of the gift table. Make sure you hand it to her directly. It *may* start to disappear before she sees it. Trust me on this one.


Items Need: 
*Clean container (I usually find flower pots, pails, tins of various sizes at the dollar or craft store marked down)
*Iceberg lettuce, cut to fit tightly down in the pot OR Floral    foam, cut to size
*Kale or leafy green lettuce
*Skewers
*Fruit (mostly strawberries, grapes, cantaloupe, pineapple,    kiwi, watermelon)  Not any fruit that gets brown
*Shaped cookie cutter (preferably metal) stars, hearts, flowers

 Place the head of iceberg lettuce or foam into the container.  It should be a tight fit.  Cover with the pretty dark green lettuce so no foam is showing through.  Wash all the fruit, and then start skewering!  I like levels, so cut/break skewers accordingly.  

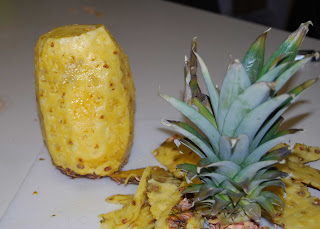
To cut the pineapple, I slice the peel off like this:


Then lay it down and cut about a 1/4"- 1/2"  circle off like this
(do it thick enough, especially with watermelon so it is strong enough when you put a skewer through)

Use a cookie cutter  to cut out your shape.  You may have to use a knife to make the edges smooth if you use a weak cookie cutter.  The skewer goes up through the core of the pineapple to make it sturdy. 

For the cantaloupe center on a pineapple flower, use a melon baller or small cookie scoop to get a ball, then cut that ball in half and use a toothpick to connect it to the pineapple.  Attach a half of a grape the same way.

Variations:  (sorry no pictures)
*Chocolate dipped strawberries are a welcome addition. (white or brown)
*Cream filled Strawberries: Cut an X out of the bottom of the strawberries (the bottom will actually be facing up--make sense?)  Just pipe a little bit of cream cheese frosting into the X for a yummy filling
*Marshmallows alternated with grapes for the tall pieces are pretty too!
Don't be jealous of my coffee table in this picture....

I want to see pictures if anyone makes one!!

Catch a Glimpse Button

Related Posts Plugin for WordPress, Blogger...